USB/Ethernet Power Sensor PWR Series Quick Start Guide
Now that you have a Mini-Circuits PWR Power Sensor, you can make key measurements of all kinds of RF components. Everything but a computer is included in the box: the Power Sensor head itself, a push-pull/USB cable (or a "Y" cable for models with Ethernet support) an N to SMA adapter (50Ω models only), and our software (via the enclosed CD or download from minicircuits.com). If you have a 32- or 64-bit Windows® computer with a keyboard, display, and CD drive or internet connection, you're ready to go, so why not get started now? It's as easy as 1, 2, 3:
- Connect the sensor to your computer: Take the cable out of the box and line up the red dot on the round push-pull connector of the control cable with the corresponding dot and receptacle on the Power Sensor. You'll feel a small click when it's fully engaged. Then plug the standard USB or RJ45 connector into your computer. ( Refer to connection diagram on data sheet.)
Depending on your operating system, a small "found new hardware" message may appear on your display.
*Remember to use the sliding sleeve to release the cable from the sensor head whenever you disconnect the two.
- Load the software: To make installation as quick and simple as possible, save any open fi les and close any applications. Load the enclosed CD into your computer's disk drive, or download the software online (minicircuits.com/support/software_download.html). If you download the software, be sure to unzip all fi les into a single folder on your desktop or in your C: directory. Then click the Install icon.
Within a few seconds, you should see the Power Sensor install screen (Fig. 1). If it doesn't appear, click Alt+Tab a few times until the installer application comes to the front of your desktop, or go to "My Computer" and look for the CD drive or download folder labeled "USB Smart Power Meter CD" and open it. Double-clicking usually does the trick.
Open the User Guide (Adobe Acrobat or other pdf reader required) by clicking on the center button, or click on "Install Now."
In a few seconds the license agreement should appear. If you read the license and click "I Agree" and "Continue", you should see the Power Meter Setup Screen. Press "OK" to proceed.
At this point it's good to take a second and confirm the destination drive for the software (Fig. 2). In most cases, the default will be your computer's hard drive (C:)\ program files\Mini-Circuits Power Meter\. Change it if you prefer. Click the large button at the top to continue installation.
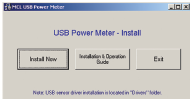
Figure 1 Install Screen You will now be given the option to accept or change the Program Group for this software (Fig. 3) When it's correct, just hit Continue.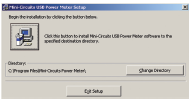
Figure 2 Software Destination
In a second or two, your installation will be complete. Click on "OK" to close the installer.
Go to the Start menu and select All Programs>Mini-Circuits USB Power Meter (default), or go to the other destination address you selected earlier. The "Mini-Circuits USB Power Meter" icon should be waiting there for you. Click on it and get started!
Click on the USB button to start the power sensor with USB control (if you have a power sensor with Ethernet control, see section 3.2 of the user guide for initial configuration of Ethernet interface). The main control display will then appear.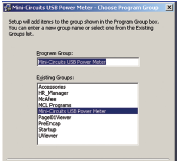
Figure 3 Program Group Confirmation Screen 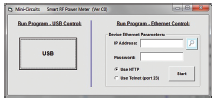
Figure 4 Connection display 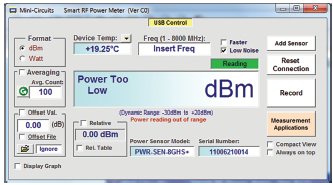
Figure 5 Main control display with no test load on the Power Sensor. -
Get the data you want: Before connecting to any test devices, be sure to confirm that the frequency and power of the device under test are within the ranges indicated on the Power Sensor display (frequency-top center of window; power-center of window below main readout), and that the device impedance is 50Ω (75Ω for PWR-SEN-2.5GHS-75 ) .
Use the built-in Type N male connector for devices under test, or the supplied N to SMA adapter (50Ω models only) as appropriate.
Whenever you reconnect a power sensor to your computer, be sure to click the "Reset Connection" button on the right side of the screen. To increase measurement accuracy, enter the frequency you wish to measure in the top center box of the display screen.
For details on all the features of your Smart Power Sensors, see the enclosed User Guide. If you have any problems, Mini-Circuits worldwide support is just a phone call or email away. Go to minicircuits.com/pages/tech.html for your regional support team. We hope you enjoy all the capabilities of your Smart Power Sensor, so whenever you have the time, send us an email or give us a ring, and let us know what you think!